查看网站有没有做301长沙网站设计多少钱一个月
摘 要
现代经济快节奏发展以及不断完善升级的信息化技术,让传统数据信息的管理升级为软件存储,归纳,集中处理数据信息的管理方式。本酒店客房管理系统就是在这样的大环境下诞生,其可以帮助管理者在短时间内处理完毕庞大的数据信息,使用这种软件工具可以帮助管理人员提高事务处理效率,达到事半功倍的效果。此酒店客房管理系统利用当下成熟完善的SSM框架,使用跨平台的可开发大型商业网站的Java语言,以及最受欢迎的RDBMS应用软件之一的Mysql数据库进行程序开发.酒店客房管理系统的开发根据操作人员需要设计的界面简洁美观,在功能模块布局上跟同类型网站保持一致,程序在实现基本要求功能时,也为数据信息面临的安全问题提供了一些实用的解决方案。可以说该程序在帮助管理者高效率地处理工作事务的同时,也实现了数据信息的整体化,规范化与自动化。
关键词:酒店客房管理系统;SSM框架;Mysql;自动化
Abstract
The fast-paced development of the modern economy and the continuous improvement and upgrading of information technology have allowed the management of traditional data information to be upgraded to software storage, induction, and centralized management of data information. This book lending system was born in such a large environment, which can help managers to process huge data information in a short time. Using this software tool can help managers improve transaction processing efficiency and achieve double the result with half the effort. This book lending system uses the current mature and perfect SSM framework, cross-platform Java language that can be used to develop large-scale commercial websites, and Mysql database, one of the most popular RDBMS application software, for program development. It realizes the functions of book basic data management, book borrowing and return, review of registered teacher information, and announcement information release. The development of the book lending system is designed to be simple and beautiful according to the needs of the operator. The layout of the function module is consistent with the same type of website. When the program realizes the basic requirements, it also provides some practical solutions for the security problems faced by the data information. . It can be said that this program not only helps managers efficiently handle work affairs, but also realizes the integration, standardization and automation of data information.
Key Words:Book borrowing system; SSM framework; Mysql; automation
目 录
目 录 III
1 绪论 1
1.1 研究背景 1
1.2 目的和意义 1
1.3 论文结构安排 2
2 相关技术 3
2.1 SSM框架介绍 3
2.2 B/S结构介绍 3
2.3 Mysql数据库介绍 4
3 系统分析 6
3.1 系统可行性分析 6
3.1.1 技术可行性分析 6
3.1.2 经济可行性分析 6
3.1.3 运行可行性分析 6
3.2 系统性能分析 7
3.2.1 易用性指标 7
3.2.2 可扩展性指标 7
3.2.3 健壮性指标 7
3.2.4 安全性指标 8
3.3 系统流程分析 8
3.3.1 操作流程分析 8
3.3.2 登录流程分析 9
3.3.3 信息添加流程分析 10
3.3.4 信息删除流程分析 11
4 系统设计 12
4.1 系统概要设计 12
4.2 系统功能结构设计 12
4.3 数据库设计 13
4.3.1 数据库E-R图设计 13
4.3.2 数据库表结构设计 14
5 系统实现 17
5.1用户信息管理 17
5.2 房间信息管理 17
5.3房间类型管理 18
5.1新闻信息管理 19
6 系统测试 19
6.1 系统测试的特点 20
6.2 系统功能测试 20
6.2.1 登录功能测试 20
6.2.2 添加类别功能测试 20
6.3 测试结果分析 21
结 论 22
致 谢 23
参考文献 24
1 绪论
1.1 研究背景
当前社会各行业领域竞争压力非常大,随着当前时代的信息化,科学化发展,让社会各行业领域都争相使用新的信息技术,对行业内的各种相关数据进行科学化,规范化管理。这样的大环境让那些止步不前,不接受信息改革带来的信息技术的企业随时面临被淘汰,被取代的风险。所以当今,各个行业领域,不管是传统的教育行业,餐饮行业,还是旅游行业,医疗行业等领域都将使用新的信息技术进行信息革命,改变传统的纸质化,需要人手工处理工作事务的办公环境。软件信息技术能够覆盖社会各行业领域是时代的发展要求,各种数据以及文件真正实现电子化是信息社会发展的不可逆转的必然趋势。本酒店客房管理系统也是紧跟科学技术的发展,运用当今一流的软件技术实现软件系统的开发,让医生管理信息完全通过管理系统实现科学化,规范化,程序化管理。从而帮助信息管理者节省事务处理的时间,降低数据处理的错误率,对于基础数据的管理水平可以起到促进作用,也从一定程度上对随意的业务管理工作进行了避免,同时,酒店客房管理系统的数据库里面存储的各种动态信息,也为上层管理人员作出重大决策提供了大量的事实依据。总之,酒店客房管理系统是一款可以真正提升管理者的办公效率的软件系统。
1.2 目的和意义
信息数据的处理完全依赖人工进行操作,会耗费大量的人工成本,特别是面对大量的数据信息时,传统人工操作不仅不能对数据的出错率进行保证,还容易出现各种信息资源的低利用率与低安全性问题。更有甚者,耽误大量的宝贵时间,尤其是对信息的更新,归纳与统计更是耗财耗力的过程。所以电子化信息管理的出现就能缓解以及改变传统人工方式面临的处境,一方面可以确保信息数据在短时间被高效处理,还能节省人力成本,另一方面可以确保信息数据的安全性,可靠性,并可以实现信息数据的快速检索与修改操作,这些优点是之前的旧操作模式无法比拟的。因此酒店客房管理系统为数据信息的管理模式的升级与改革提供了重要的窗口。
1.3 论文结构安排
为了帮助用户更好的了解和理解程序的开发流程与相关内容,本文将通过六个章节进行内容阐述。
第一章:描述了程序的开发背景,程序运用于现实生活的目的与意义,以及程序文档的结构安排信息;
第二章:描述了程序的开发环境,包括程序开发涉及到的技术,程序开发使用的数据存储工具等信息;
第三章:描述了程序着手进行开发时,会面临的可行性问题,并对程序功能以及性能要求进行描述;
第四章:描述了程序大功能模块下的功能细分信息,以及存储程序数据的数据库表文件结构的设计信息等;
第五章:描述了程序的功能实现界面的内容,也对程序操作人员操作的部分功能进行了描述;
第六章:描述了程序功能的测试内容,并介绍了系统测试的概念与方法。
2 相关技术
2.1 SSM框架介绍
本课题程序开发使用到的框架技术,英文名称缩写是SSM,在JavaWeb开发中使用的流行框架有SSH、SSM、SpringMVC等,作为一个课题程序采用SSH框架也可以,SSM框架也可以,SpringMVC也可以。SSH框架是属于重量级别的框架,配置繁琐,不够灵活,修改程序需要修改好多个文件,并且运行起来也占用内存较高,CPU使用率相对也高,SpringMVC是Spring开发的一套MVC架构,更灵活更好用,SSM框架取中间值,既没有SSH臃肿,也没有SpringMVC简化,属于中间级别的,在配置过程和使用过程中更能编写和理解。MyBatis框架取代Hibernate框架是因为它更灵活,不需要完全在框架里操作,它在数据操作上可以写出更灵活的代码,它的性能也比Hibernate框架更稳定。总的来说,使用SSM框架是通过综合考虑而使用的,网上有很多的使用教程和心得体会,而且SSM又是这么的流行,用SSM框架开发是顺其自然的。
2.2 B/S结构介绍
在早期,一些使用HTML语言编写的文件,再集合一些其它资源文件就可以组成一个最简单的Web程序,了解了Web程序也需要了解Web站点,它们之间的关系就是一个或者多个Web程序可以放在Internet上的一个Web站点(Web服务器)中进行使用。可以说Web应用程序的开发也带动了B/S这种网络结构模式的兴起。B是Brower(浏览器)的首字母,S是Server(服务器)的首字母,两个首字母进行组合就成了网络结构模式的简称B/S。由于这种结构模式通过安装在客户端的浏览器进行服务器的访问,可以把程序的核心功能安排在服务器中进行处理,给程序的开发,后期使用和维护省去了许多工作。图2.1展示的就是使用这种架构开发的程序的工作原理。
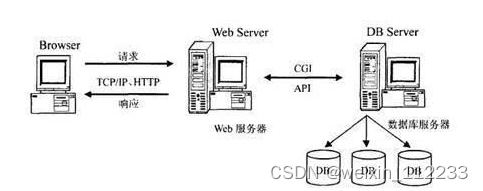
图2.1 B/S架构的工作原理图
2.3 Mysql数据库介绍
开发的程序面向用户的只是程序的功能界面,让用户操作程序界面的各个功能,那么很多人就会问,用户使用程序功能生成的数据信息放在哪里的?这个就需要涉及到数据库的知识了,一般来说,程序开发通常就会对常用数据存储工具的特点进行分析比对,比如Mysql数据库的特点与优势,Access数据库的特点与优势,Sqlserver数据库的特点与优势等,最终看哪个数据库与需要开发的程序比较匹配,也符合程序功能运行需要的数据存储要求,比如,需要开发商业级别的程序,存储的数据对数据库要求较高,可以选用Oracle,如果只是比较简单的程序,对数据存储没有过多要求,可以选用微软旗下的Access,当开发程序要求数据库占用空间小,并能满足程序数据存储要求时,就可以考虑Oracle公司从瑞典MySQL AB公司在很早之前就收购过一个关系型数据库,它是现在的Mysql数据库。在数据库工具里面它是最受认可的其中一个应用软件。需要说明的信息就是,本程序的开发就运用到了此数据库。它将程序数据通过使用不同的数据表格进行保存,在增加了程序数据的存储速度的时候,也提高了数据库的灵活性。 图2.2展示的就是MySQL的架构图。
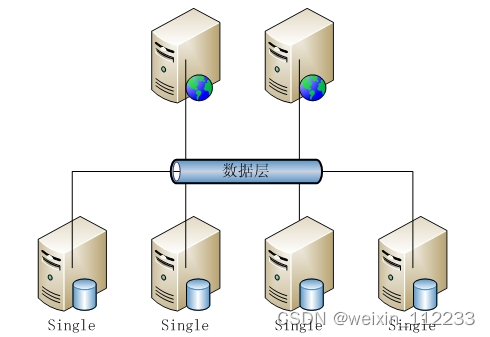
图2.2 MySQL数据库架构图
3 系统分析
当用户确定开发一款程序时,是需要遵循下面的顺序进行工作,概括为:系统分析–>系统设计–>系统开发–>系统测试,无论这个过程是否有变更或者迭代,都是按照这样的顺序开展工作的。系统分析就是分析系统需要做什么的问题,主要目的就是确定系统的功能,这也为接下来的工作做了一个好的开端。
3.1 系统可行性分析
开发一款程序软件不仅需要时间,也需要人力,物力资源。而进行可行性分析这个环节就是解决用户这方面的疑问,看看程序在当前的条件下是否可以进行开发。
3.1.1 技术可行性分析
此程序选用的开发语言是Java,这种编程语言有着丰富的数据类型,在指令控制语句上也比较完善,更重要的就是对类与对象的大力支持,这些优点为程序开发者提供了技术保障,尤其是现在代码都逐渐模块化,有关系统功能开发的源码在网络上都公开展示了,所以让具备一定计算机开发基础的开发人员独立开发系统在技术上也逐渐容易。
3.1.2 经济可行性分析
开发此程序最关键的设备就是一台电脑,无论是学校计算机室配备的电脑,还是自己入学以来购置的笔记本,都是可以符合开发要求的设备,另外在网络上,学校本已完全覆盖了校园网,所以在设备以及网络上无须考虑经济问题。
3.1.3 运行可行性分析
随着电脑软件以及配套硬件的完善升级,当下的计算机环境是一片大好,尤其是计算机已经广泛普及到家家户户,所以计算机设备现在是随处可见,由于本次开发的程序占有的资源耗费较小,在一般的电脑或笔记本上都能轻松运转起来。
通过上面的可行性描述,可以从经济,技术,运行方面解决程序开发是否可行的问题。因此可以认为该程序软件是可以进行开发的。
3.2 系统性能分析
系统性能分析也是比较重要的内容,进行系统性能分析就是为了确保系统的功能要能够在生活中运行使用时,达到规定的指标,因此一个完整的系统软件,是需要进行系统的性能分析这个步骤的。本次进行性能分析主要从易用性指标,可扩展性指标,系统健壮性指标,系统安全性指标这几个方面进行分析。
3.2.1 易用性指标
本次程序软件的开发的目的就是让使用者可以通过使用该软件提高信息数据的管理效率,同时该程序软件也需要针对不同的操作用户设置对应的功能,因此,此程序的操作流程应该尽量与用户日常操作软件的行为习惯相贴合,另外,程序软件的设计与开发也应考虑非计算机专业用户的计算机操作水平,要让大部分使用者都可以轻松操作程序提供的各个功能。
3.2.2 可扩展性指标
当前需要开发的程序软件是根据当下的用户需求进行设计开发的,但是随着时间的推移,社会大环境的改变,开发出的程序也是需要与时俱进的,需要根据用户不断变换的需求进行相应的功能内容的扩展,需要注意的就是,当对成型的程序进行功能模块新增时,仍然需要保证程序原有架构以及功能不能受到影响,新增的功能模块在系统中也能够运行正常,该指标达标也就可以保证此程序是可以在满足信息管理要求下,从容应对市场环境的变化。
3.2.3 健壮性指标
程序软件的开发就是为了投入使用时,可以一直稳定的处理各种数据信息,程序软件一旦不稳定,也会给使用者带来干扰。因此从性能分析的角度,就要要求程序软件在应对使用者的误操作,或者是使用者因为各种原因,填写有误的数据等情况时,程序要一直保持稳定,并能够正常让使用者进行使用。当程序的某个功能模块出现异常时,程序的其它功能模块也要能够确保正常使用。程序的健壮性指标达标可以让使用者产生良好的用户体验。
3.2.4 安全性指标
程序软件的安全问题是首要问题,毕竟程序对应数据库里面存放的数据信息是庞大的,里面也包括了许多重要的个人信息,这就对程序要具备一个完善的安全机制提出了要求。因此程序必须要设置登录功能用以进行用户身份的检查,以及身份和权限的匹配,通过对不同用户身份进行功能约束,绝不容忍用户越权操作程序。另外,也需要时刻防范计算机病毒,还有黑客,通过采取针对性的办法进行安全应对,确保程序时刻处于安全的环境,让使用者放心使用。
3.3 系统流程分析
3.3.1 操作流程分析
程序上交给用户进行使用时,需要提供程序的操作流程图(如图3.1所示),这样便于用户容易理解程序的具体工作步骤,现如今程序的操作流程都有一个大致的标准,即先通过登录页面提交登录数据,通过程序验证正确之后,用户才能在程序功能操作区页面操作对应的功能。
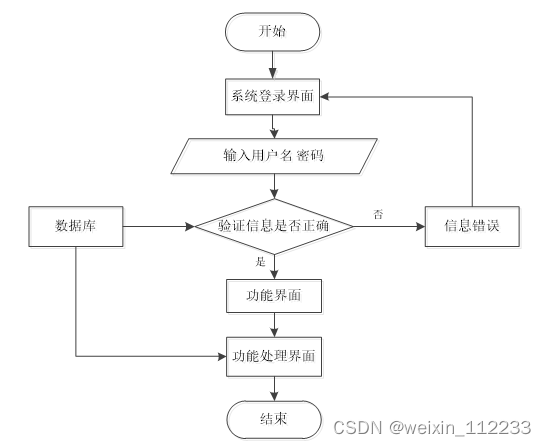
图3.1 程序操作流程图
3.3.2 登录流程分析
在这个部分,需要对程序的登录功能模块的运行流程(如图3.2所示),进行单独说明。程序设置登录模块也是为了安全起见,让用户使用放心,登录模块主要就是让用户提交登录信息,程序进行数据验证,验证通过的用户才能够成功登录程序。
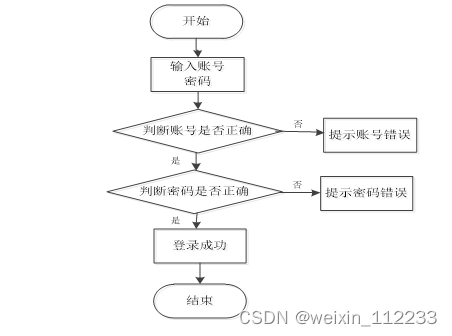
图3.2 程序登录流程图
3.3.3 信息添加流程分析
程序的添加功能就是提供给操作者录入信息的功能,不管是涉及到用户信息添加,还是其它功能模块涉及到的信息添加,程序的信息添加流程(如图3.3所示)都是一致的。程序都是先对操作者录入的数据进行判定,这个判定规则是一段提前编写完成的程序代码,当程序判定数据符合要求时,才会把操作者录入的数据登记在数据表里面,比如添加的用户信息,就会把新添加的用户信息写入用户信息的数据表文件里面。
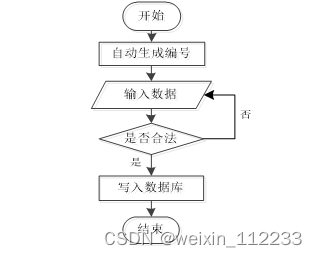
图3.3 信息添加流程图
3.3.4 信息删除流程分析
当从程序里面删除某种无效数据时,遵循程序的信息删除流程(如图3.4所示),先要选中操作者需要删除的数据,程序为了预防操作者误删信息,也会进行提示,当操作者真正确定要删选中的信息时,该信息就会从数据库中被永久删除。

图3.4 信息删除流程图
4 系统设计
酒店客房管理系统的设计方案比如功能框架的设计,比如数据库的设计的好坏也就决定了该系统在开发层面是否高效,以及在系统维护层面是否容易维护和升级,因为在系统实现阶段是需要考虑用户的所有需求,要是在设计阶段没有经过全方位考虑,那么系统实现的部分也就无从下手,所以系统设计部分也是至关重要的一个环节,只有根据用户需求进行细致全面的考虑,才有希望开发出功能健全稳定的程序软件。
4.1 系统概要设计
本次拟开发的系统为了节约开发成本,也为了后期在维护和升级上的便利性,打算通过浏览器来实现系统功能界面的展示,让程序软件的主要事务集中在后台的服务器端处理,前端部分只用处理少量的事务逻辑。下面使用一张图(如图4.1所示)来说明程序的工作原理。
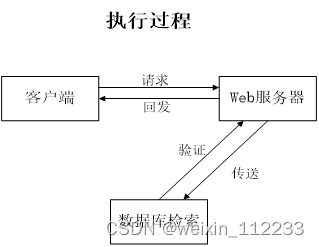
图4.1 程序工作的原理图
4.2 系统功能结构设计
在分析并得出使用者对程序的功能要求时,就可以进行程序设计了。如图4.2展示的就是管理员功能结构图。
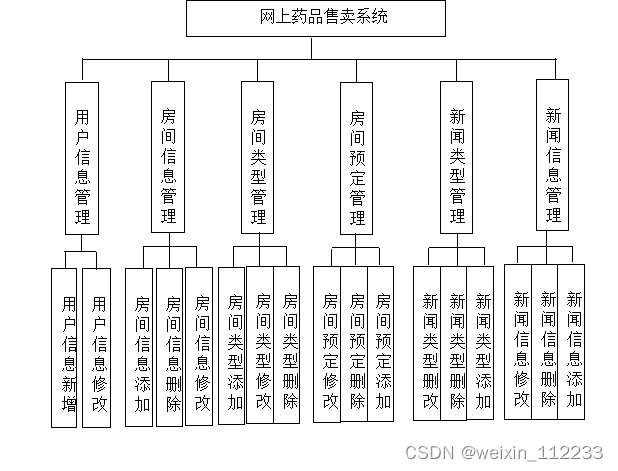
图4.2 系统功能结构图
4.3 数据库设计
开发一个系统也需要提前设计数据库。这里的数据库是相关数据的集合,存储在一起的这些数据也是按照一定的组织方式进行的。目前,数据库能够服务于多种应用程序,则是源于它存储方式最佳,具备数据冗余率低的优势。虽然数据库为程序提供信息存储服务,但它与程序之间也可以保持较高的独立性。总而言之,数据库经历了很长一段时间的发展,从最初的不为人知,到现在的人尽皆知,其相关技术也越发成熟,同时也拥有着坚实的理论基础。
4.3.1 数据库概念设计
这部分内容需要借助数据库关系图来完成,也需要使用专门绘制数据库关系图的工具,比如Visio工具就可以设计E-R图(数据库关系图)。设计数据库,也需要按照设计的流程进行,首先还是要根据需求完成实体的确定,分析实体具有的特征,还有对实体间的关联关系进行确定。最后才是使用E-R模型的表示方法,绘制本系统的E-R图。不管是使用亿图软件,还是Visio工具,对于E-R模型的表示符号都一样,通常矩形代表实体,实体间存在的关系用菱形符号表示,实体的属性也就是实体的特征用符号椭圆表示。最后使用直线将矩形,菱形和椭圆等符号连接起来。接下来就开始对本系统的E-R图进行绘制。
(1)下图是论坛实体和其具备的属性。
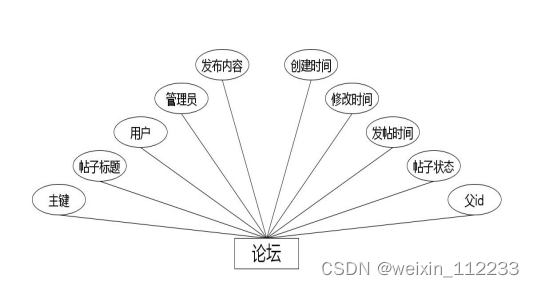
图4.1 论坛实体属性图
(2)下图是用户实体和其具备的属性。
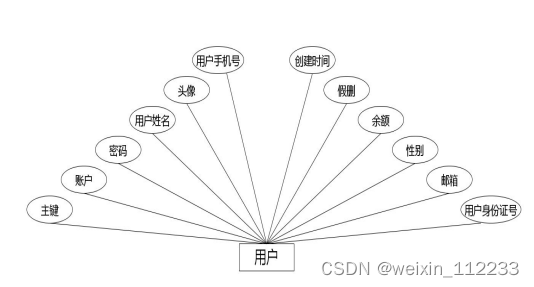
图4.2 用户实体属性图
(3)下图是房间预定实体和其具备的属性。
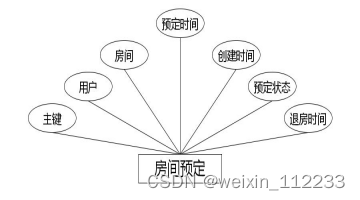
图4.3 房间预定实体属性图
(4)下图是字典表实体和其具备的属性。
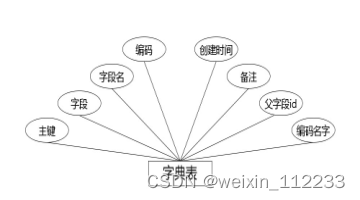
图4.4 字典表实体属性图
(5)下图是房间信息实体和其具备的属性。
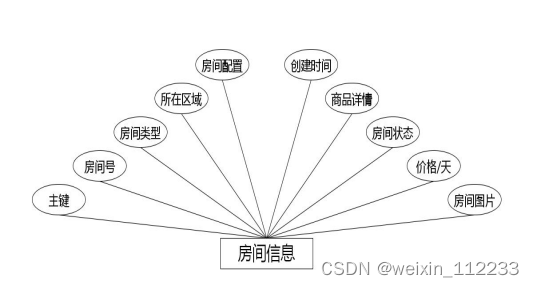
图4.5 房间信息实体属性图
(6)下图是房间留言实体和其具备的属性。
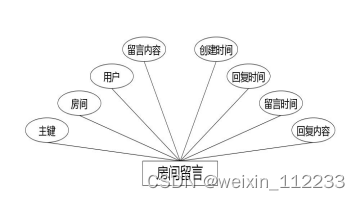
图4.6 房间留言实体属性图
(7)下图是用户表实体和其具备的属性。
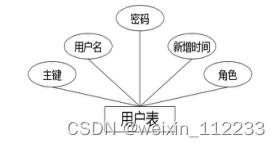
图4.7 用户表实体属性图
(8)下图是新闻信息实体和其具备的属性。
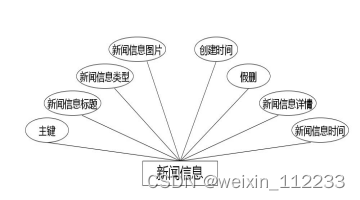
图4.8 新闻信息实体属性图
4.3.2 数据库表结构设计
数据库系统一旦选定之后,需要根据程序要求在数据库中建立数据库文件,并在已经完成创建的数据库文件里面,为程序运行中产生的数据建立对应的数据表格,数据表结构设计就是对创建的数据表格进行字段设计,字段长度设计,字段类型设计等,当数据表格合理设计完成之后,才能正常存储相关程序运行产生的数据信息。
表4.1字典表表
序号 列名 数据类型 说明 允许空
1 Id Int id 否
2 dic_code String 字段 是
3 dic_name String 字段名 是
4 code_index Integer 编码 是
5 index_name String 编码名字 是
6 super_id Integer 父字段id 是
7 beizhu String 备注 是
8 create_time Date 创建时间 是
表4.2房间信息表
序号 列名 数据类型 说明 允许空
1 Id Int id 否
2 fangjian_name String 房间号 是
3 fangjian_types Integer 房间类型 是
4 fangjian_address String 所在区域 是
5 fangjian_peizhi String 房间配置 是
6 fangjian_photo String 房间图片 是
7 fangjian_new_money BigDecimal 价格/天 是
8 status_types Integer 房间状态 是
9 fangjian_content String 商品详情 是
10 create_time Date 创建时间 是
表4.3房间留言表
序号 列名 数据类型 说明 允许空
1 Id Int id 否
2 fangjian_id Integer 房间 是
3 yonghu_id Integer 用户 是
4 fangjian_liuyan_text String 留言内容 是
5 reply_text String 回复内容 是
6 insert_time Date 留言时间 是
7 update_time Date 回复时间 是
8 create_time Date 创建时间 是
表4.4房间预定表
序号 列名 数据类型 说明 允许空
1 Id Int id 否
2 yonghu_id Integer 用户 是
3 fangjian_id Integer 房间 是
4 fangjianyuding_time Date 预定时间 是
5 update_time Date 退房时间 是
6 fangjianyuding_types Integer 预定状态 是
7 create_time Date 创建时间 是
表4.5论坛表
序号 列名 数据类型 说明 允许空
1 Id Int id 否
2 forum_name String 帖子标题 是
3 yonghu_id Integer 用户 是
4 users_id Integer 管理员 是
5 forum_content String 发布内容 是
6 super_ids Integer 父id 是
7 forum_state_types Integer 帖子状态 是
8 insert_time Date 发帖时间 是
9 update_time Date 修改时间 是
10 create_time Date 创建时间 是
表4.6新闻信息表
序号 列名 数据类型 说明 允许空
1 Id Int id 否
2 news_name String 新闻信息标题 是
3 news_types Integer 新闻信息类型 是
4 news_photo String 新闻信息图片 是
5 insert_time Date 新闻信息时间 是
6 news_content String 新闻信息详情 是
7 news_delete Integer 假删 是
8 create_time Date 创建时间 是
表4.7用户表
序号 列名 数据类型 说明 允许空
1 Id Int id 否
2 yonghu_name String 用户姓名 是
3 yonghu_photo String 头像 是
4 yonghu_phone String 用户手机号 是
5 yonghu_id_number String 用户身份证号 是
6 yonghu_email String 邮箱 是
7 new_money BigDecimal 余额 是
8 yonghu_delete Integer 假删 是
9 create_time Date 创建时间 是
表4.8用户表表
序号 列名 数据类型 说明 允许空
1 Id Int id 否
2 username String 用户名 是
3 password String 密码 是
4 role String 角色 是
5 addtime Date 新增时间 是
5 系统实现
系统实现部分就是将系统分析,系统设计部分的内容通过编码进行功能实现,以一个实际应用系统的形式展示系统分析与系统设计的结果。前面提到的系统分析,系统设计最主要还是进行功能,系统操作逻辑的设计,也包括了存储数据的数据库方面的设计等内容,系统实现就是一个最终的实施阶段,将前面的设计成果进行物理转化,最终出具可以运用于实际的软件系统。
5.1用户信息管理
如图5.1显示的就是用户信息管理页面,此页面提供给管理员的功能有:用户信息的查询管理,可以删除用户信息、修改用户信息、新增用户信息,
还进行了对用户名称的模糊查询的条件
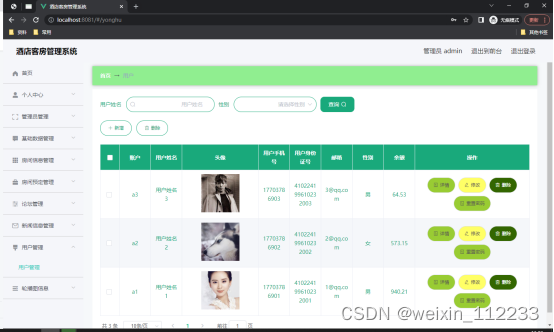
图5.1 用户信息管理页面
5.2 房间信息管理
如图5.2显示的就是房间信息管理页面,此页面提供给管理员的功能有:查看已发布的房间信息数据,修改房间信息,房间信息作废,即可删除。
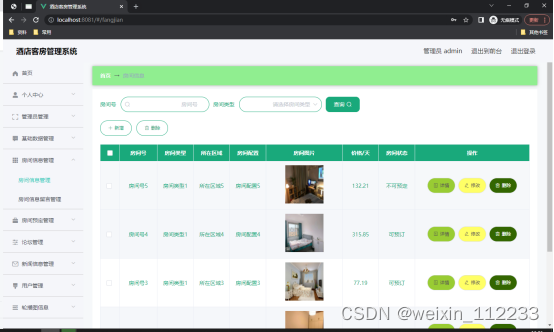
图5.2 房间信息管理页面
5.3房间类型管理
如图5.3显示的就是房间类型管理页面,此页面提供给管理员的功能有:根据房间类型进行条件查询,还可以对房间类型进行新增、修改、查询操作等等。
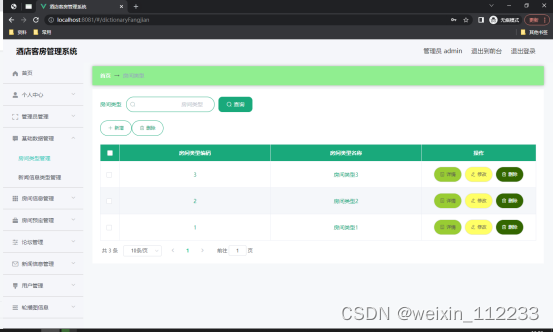
图5.3 房间类型管理页面
5.1新闻信息管理
如图5.4显示的就是新闻信息管理页面,此页面提供给管理员的功能有:根据新闻信息进行新增、修改、查询操作等等。
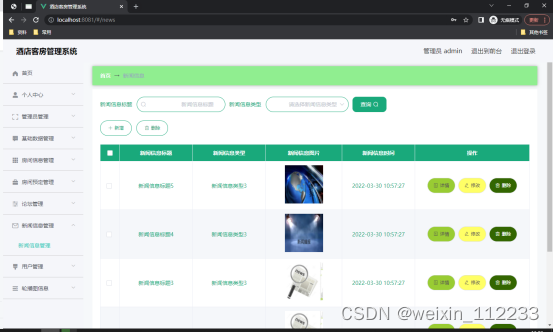
图5.4 新闻信息管理页面
6 系统测试
程序软件一旦被开发完成之后,在真正投入日常生活中进行运行使用之前,是必须要经历测试这一个重要的操作环节,因为开发期间注重的是每个单独功能模块的开发,尽管每次开发完成一个单独功能模块时,会通过单元测试进行检验,检验合格才会让程序员继续开发下一个子功能模块,以此类推,当程序员完成所有的系统子功能模块的开发时,这个时候就需要引进系统测试,系统测试就是把所有的子功能模块集成到一起,构建成整个系统,在指定的运行环境下进行运行,主要就是测试系统的所有功能模块在一起是否良好运行,一旦程序软件通过了系统测试这一环节,就意味着它可以进行最终的验收测试了,这个测试步骤的操作用户是程序面向的客户或者是最终用户了。
6.1 系统测试的特点
系统测试也是为了保证系统正式上线后,可以稳定正常运行,给使用者带来便利。系统测试也有其对应的特点:
(1)系统测试它包括了端到端的完整测试;
(2)系统测试也对程序软件的架构方面,程序软件的业务需求等方面进行了测试;
(3)系统测试一旦采用正确的方法进行,这将减少程序正式上线之后产生的各种错误;
系统测试一般都是在跟生产环境相似的环境当中运行,程序的功能比如添加功能,删除功能,修改功能等都会使用同样的数据在新系统和现有系统中进行比较,这样做让用户对新系统中的添加,修改,删除等功能能够更好地理解,也能提升用户对新系统的满意度。
6.2 系统功能测试
6.2.1 登录功能测试
要保障程序安全,首先就要从入门门槛抓起,所以程序的登录模块也是很重要的程序入门门槛,务必要保证此功能可以安全运行使用。此次对程序登录模块测试选择管理员角色进行测试(如表6.1所示)。
表6.1 登录功能测试数据表
登录账号 登录密码 操作人 最终结果
abc abc 管理员 登录进入程序
123 abc 管理员 弹出错误登录提示
abc 123 管理员 弹出错误登录提示
6.2.2 添加类别功能测试
酒店客房管理系统需要管理员添加类别信息,类别名称是程序设置的必填数据,而且添加的类别名称也不能够是数据库里面的存在的数据。对添加类别功能测试时,测试数据在下表展示。
表6.2 添加类别功能测试数据表
类别名称 反馈结果
类别1 失败
类别2 失败
类别3 成功
6.3 测试结果分析
程序经过了上述的测试环节,可以得出的测试结论有:
第一点,可以确定开发出来的酒店客房管理系统是符合同类型系统的要求;
第二点,用户要求酒店客房管理系统需要具备的功能都已开发完成并能够正常使用;
第三点,酒店客房管理系统界面简洁美观,操作流程清晰明了;
第四点,酒店客房管理系统的安全性,以及运行性能符合开发要求。
至此,酒店客房管理系统可以确保所有功能能够按照预期目标进行运行,可以正式投入生活中运行使用!
结 论
通过对酒店客房管理系统的开发,让我深刻明白开发一个程序软件需要经历的流程,当确定要开发一个酒店客房管理系统的程序时,我在开发期间,对其功能进行合理的需求分析,然后才是程序软件的功能的框架设计,数据库的实体与数据表设计,程序软件的功能详细界面实现,以及程序的功能测试等进行全方位的细致考虑,虽然在此过程中,各个环节都遇到了大大小小的困难,但是通过对这些问题进行反复的分析,深入的思考,借助各种相关文献资料提供的方法与解决思路成功解决面临的各个问题,最后成功的让我开发的酒店客房管理系统得以正常运行。
酒店客房管理系统在功能上面是基本可以满足用户对系统的操作,但是这个程序软件也有许多方面是不足的,因此,在下一个时间阶段,有几点需要改进的地方需要提出来,它们分别是:
(1)操作页面可以满足用户简易操作的要求,但是在页面多样化设计层面上需要把一些比较丰富的设计结构考虑进来。
(2)程序软件的总体安全性能需要优化,例如程序的退出安全性,以及程序的并发性等问题都需要进行安全性升级,让开发的酒店客房管理系统与现实中的相关网站更贴合。
(3)需要对程序的数据结构方面,程序的代码方面等进行优化,让运行起来的程序可以保持稳定运行,也让程序能够保证短时间内处理相关事务,节省处理事务的时间,提高事务处理的效率,同时对服务器上资源占用的比例进行降低。
酒店客房管理系统的开发一方面是对自身专业知识技能进行最终考核,另一方面也是让自己学会独立解决程序开发过程中所遇到的问题,掌握将理论知识运用于程序开发实践的方法。酒店客房管理系统的开发最终目标就是让系统更具人性化,同时在逻辑设计上,让系统能够更加的严谨。
致 谢
大学期间的学习时光对于我来说是美好而短暂的,在这期间我也接触了许多可爱的大学同学们,以及兢兢业业教学的老师们,在我的毕业论文即将完成之际,我想对那些曾经给予我支持,帮助,还有鼓励的同学和老师以及家人们表达我内心的无比感激之情。
首先,感谢给予我论文指导的指导老师,从开题报告,任务书,论文大纲的编写与系统的功能框架设计,到最终的毕业论文,都是指导老师全程参与的悉心指导和帮忙,才能够让我的毕业论文可以符合学院要求编写完成。我的指导老师一丝不苟的教学精神以及在学术上的严谨作风,这些优点是值得我不断去努力学习的。
其次,感谢大学同学的陪伴与帮助,在我独立编写毕业论文期间,大学同学的鼓励与耐心的帮助使得我少走很多弯路,节省毕业论文的编写时间,也让我有更多精力去完善我开发的系统。
最后,感谢我最亲密的家人带给我的包容和关爱,我能够安心学习也是来源于家人们对我的无微不至的照顾,这样我才可以顺顺利利完成我的大学学业。
毕业倒计时之际,希望在今后的工作中,在今后的生活中,我会一直谨记老师们带给我的孜孜不倦的教诲,并通过不懈的努力和追求来改变自己,以此报答那些曾支持过以及帮助过我的人!
参考文献
[1]宁昭铱,陈静,张立斌.一个酒店客房管理系统平台的设计[J].科技经济导刊,2017(01):32+25.
[2]李鑫.浅谈信息化酒店客房管理系统的设计与实现[J].民营科技,2016(11):74.
[3]宋丽娜.基于JSP的Web开发中文乱码问题的研究与解决[J].电子技术,2015,42(11):5-7.
[4]汪君宇.基于JSP的Web应用软件开发技术分析[J].科技创新与应用,2018(16):158-160.
[5]赵钢.JSP Servlet+EJB的Web模式应用研究[J].电子设计工程,2016,21(13):47-49.
[6]肖英.解决JSP/Servlet开发中的中文乱码问题[J].科技传播,2017,(1)11-25.
[7]朱钧.基于角色的jsp通用权限系统设计与实现[D].山东大学,2014.
[8]康牧.JSP动态网站开发实用教程[M].清华大学出版社,2014.
[9]王建国.数据库设计在网站开发中的应用[J].山东农业工程学院学报,2017,34(04):158-159+164.
[10]张知青.基于关系数据库的查询方法及优化技术分析[J].煤炭技术,2015,31(05):218-220.
[11]陈志誉.Java工具及其调度方法研究[D].华南理工大学,2018.
[12]张孝祥,徐明华.JAVA基础与案例开发详解[M].清华大学出版社,2014.
[13]刘亚宾.精通Eclipse–JAVA技术大系[M].电子工业出版社,2015.
[14]曾志明.网站开发技术的比较研究[J].电脑知识与技术,2015,6(05):1075-1078.
[15]卫红春.信息系统分析与设计[M].北京:清华大学出版社,2014.
[16]于万波.网站开发与应用案例教程[M].清华大学出版社,2013.
[17]黎连业,王华,李淑春.软件测试与测试技术[M].清华大学出版社,2014.
[18]Xin-hua YOU. Brief Discuss the Application of Object-oriented in Java Language Programming Course[A]. Advanced Science and Industry Research Center.Proceedings of 2018 3rd International Conference on Automation, Mechanical and Electrical Engineering (AMEE 2018)[C].Advanced Science and Industry Research Center:Science and Engineering Research Center,2018:5.
[19]Menglin Liu. Design and Research of Batch Query System Based on Java[A]. Research Institute of Management Science and Industrial Engineering.Proceedings of 2018 4th World Conference on Control, Electronics and Computer Engineering (WCCECE 2018)[C].Research Institute of Management Science and Industrial Engineering:计算机科学与电子技术国际学会(Computer Science and Electronic Technology International Society),2018:5.